Preparation of Google Cloud Compute Engine VM for Mautic 5
- Sign up for Google Cloud (GCP) if you have not yet already. You can use your existing Google account to sign in, for example, a Gmail or Google Workspace account. Currently, new customers get a $300 USD (or local currency equivalent) credit valid for 90 days. This is enough to run even a production instance of Mautic for 3 months.
- You can use the default project “My First Project” or create a new GCP project specifically for installing Mautic. A project is a way of organizing a set of GCP services that are related to one another, for example, a specific application or group of applications that rely on the same custom images, storage buckets, virtual networks, etc. To create a new project, click the dropdown at the top of the Google Cloud Console once you sign in, and select “New Project.” All projects are billed to your default billing account, and can therefore use the promotional credit, unless you change it.


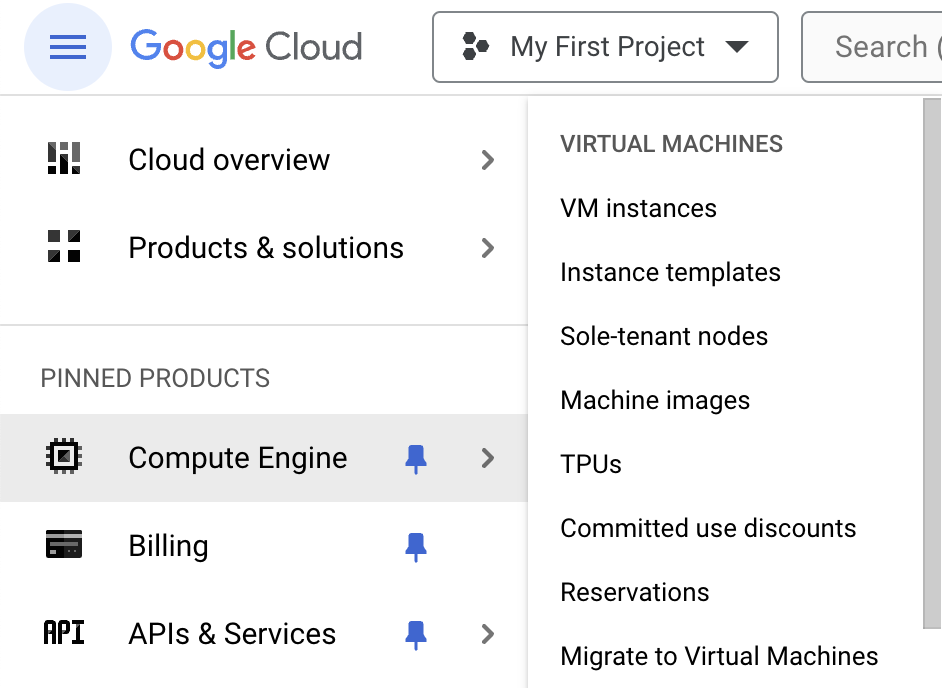
- From the Google Cloud menu on the left sidebar, navigate to Compute Engine > VM Instances. You may have to enable the Compute Engine API if this is your first time using it within the project. Then, click “Create Instance” to begin creating your virtual machine (compute instance).

- Then, click “Create Instance” to begin creating your compute instance. For installing Mautic 5 using Composer, the bare minimum instance size should be 2 vCPUs and 2 GB RAM. Even with relatively small number of contacts, the recommended specs for production use would probably be to at least double the RAM, and consider increasing the vCPUs as well.
Here are some of the defaults to consider changing when creating a Google Cloud compute instance:
Region and Zone: us-central-1 (Iowa) is the default region of Google Cloud, much like how us-east-1 (N. Virginia) is the default for AWS. Depending on your business location, and factors such as data sovereignty and GDPR, you may wish to select a different region. Compute instance pricing differs outside of the US regions, such as Europe or Asia. Any zone within a region will work fine.
Machine Type: For a minimal Mautic 5 configuration (e.g. dev and testing), the e2-small machine type (2 vCPU, 2 GB memory) under the E2 instance family may be sufficient. For a production Mautic 5 instance used by a SME with a small number of contacts & campaigns, at least an e2-medium (2 vCPU, 4 GB memory) might be more suitable.
For a Mautic 5 instance used by a larger team with higher sending volume, stepping up to the more powerful N2 family with dedicated vs. shared cores is probably best. A custom machine type such as n2-custom-4-8192 (4 vCPU, 8 GB memory), or a preset like n2-standard-4 (4 vCPU, 16 GB memory) can be considered. The instance families other than E2 also receive a persistent usage discount (PUD) for using the machine the entire month.

Pricing for GCP machine types recommended for Mautic (in US regions, as of Jan 2024)
-
- Dev & Test: e2-small (2 vCPU, 2 GB memory) – $12.23/mo
- Small Business: e2-medium (2 vCPU, 4 GB memory) – $24.46/mo
- “Scale Up”: e2-custom-4-8192 (4 vCPU, 8 GB memory) – $122.83/mo (-$24.57 PUD)
- Team: n2-standard-4 (4 vCPU, 16 GB memory) – $141.79/mo (-$28.36 PUD)
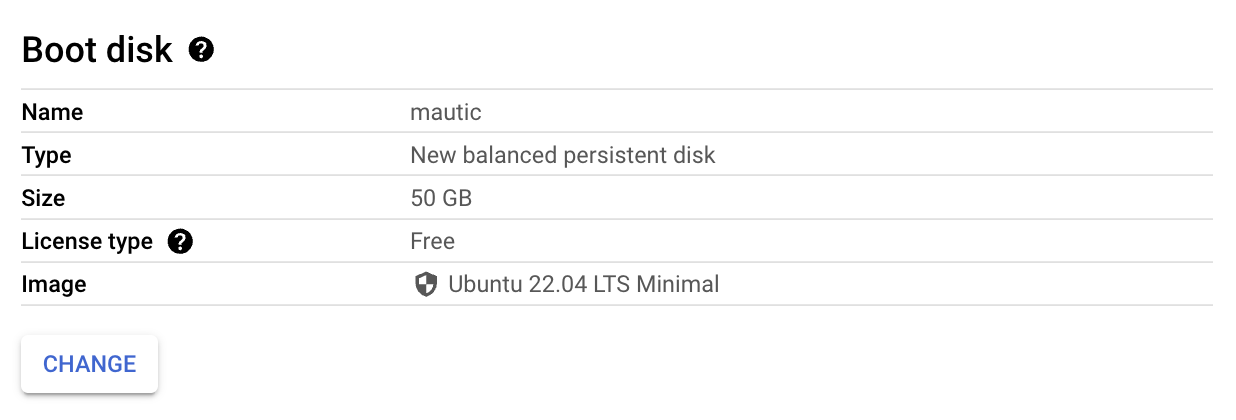
Boot Disk & Image: The boot disk should be changed from Google Cloud’s default of 10 GB to a minimum of 50 GB. This provides sufficient space for the OS, web server, dependencies such as PHP, Node.js, NPM, Mautic itself, and the database server. The Balanced persistent disk type provides the I/O performance of an SSD for most purposes. It should be used for any disks where the OS and applications run.
Additional persistent disks, with different disk types such as “standard”, can be added and attached to your Mautic server later for scaling. The boot disk can also be resized to a larger capacity but cannot be shrunk to a smaller one; it also requires a system reboot.
The image represents the operating system that your compute instance will be created with. For Mautic 5, most users go with Ubuntu 22.04 LTS Minimal (x86/64). You can select it from the drop-down list of public images, once you click the “Change” button under the Boot Disk heading in the compute instance launch wizard.
This is the latest Ubuntu long-term support (LTS) version that receives security patches and bug fixes 10 years from its release date. Because we are installing a headless server with no desktop environment, the “minimal” option will install only the essential packages.
Firewall and Observability:
To allow your Mautic instance to be reachable for the Internet, you must select the Allow HTTP Traffic and Allow HTTPS Traffic check boxes under the “Firewall” heading of the instance launch wizard.
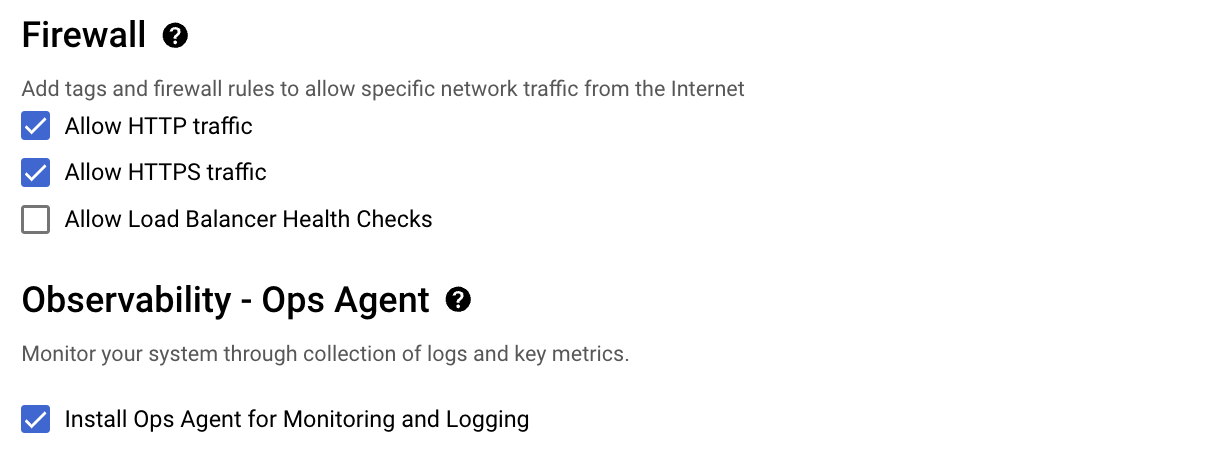
Also, for ease of troubleshooting and monitoring from the Google Cloud Console, it can be helpful to enable the Google Cloud Ops Agent on the VM by selecting the Install Ops Agent for Monitoring and Logging check box under the “Observability” header.
Per-project, the first 50 GB/month of logs captured by the Ops Agent are free of charge. A $0.01/GB/month log storage fee applies.
- Finally, click the “Create” button highlighted in blue at the bottom of the instance setup wizard to launch the compute instance. For the remainder of this guide, we will refer to the “compute instance” as VM, to prevent confusion with the term “Mautic instance.” Provided there is sufficient capacity, one VM can theoretically host multiple applications, which could be multiple Mautic instances accessible at different URLs, or even other apps, such as a WordPress or Grav CMS website.
- Once the VM is finished being created, you will see it in the list of VMs you have in Google Cloud. It will have an internal IP address where it can be accessed by other services within the virtual private cloud (VPC), as well as an external IP address which you need to administer it via SSH and point your DNS records to.
However, the external IP address given to a VM by default is an “Ephemeral” IP that can change each time the VM is stopped and restarted. Each time the IP changes, you must update the DNS records; Otherwise, your instance becomes inaccessible at its Mautic URL from a web browser.
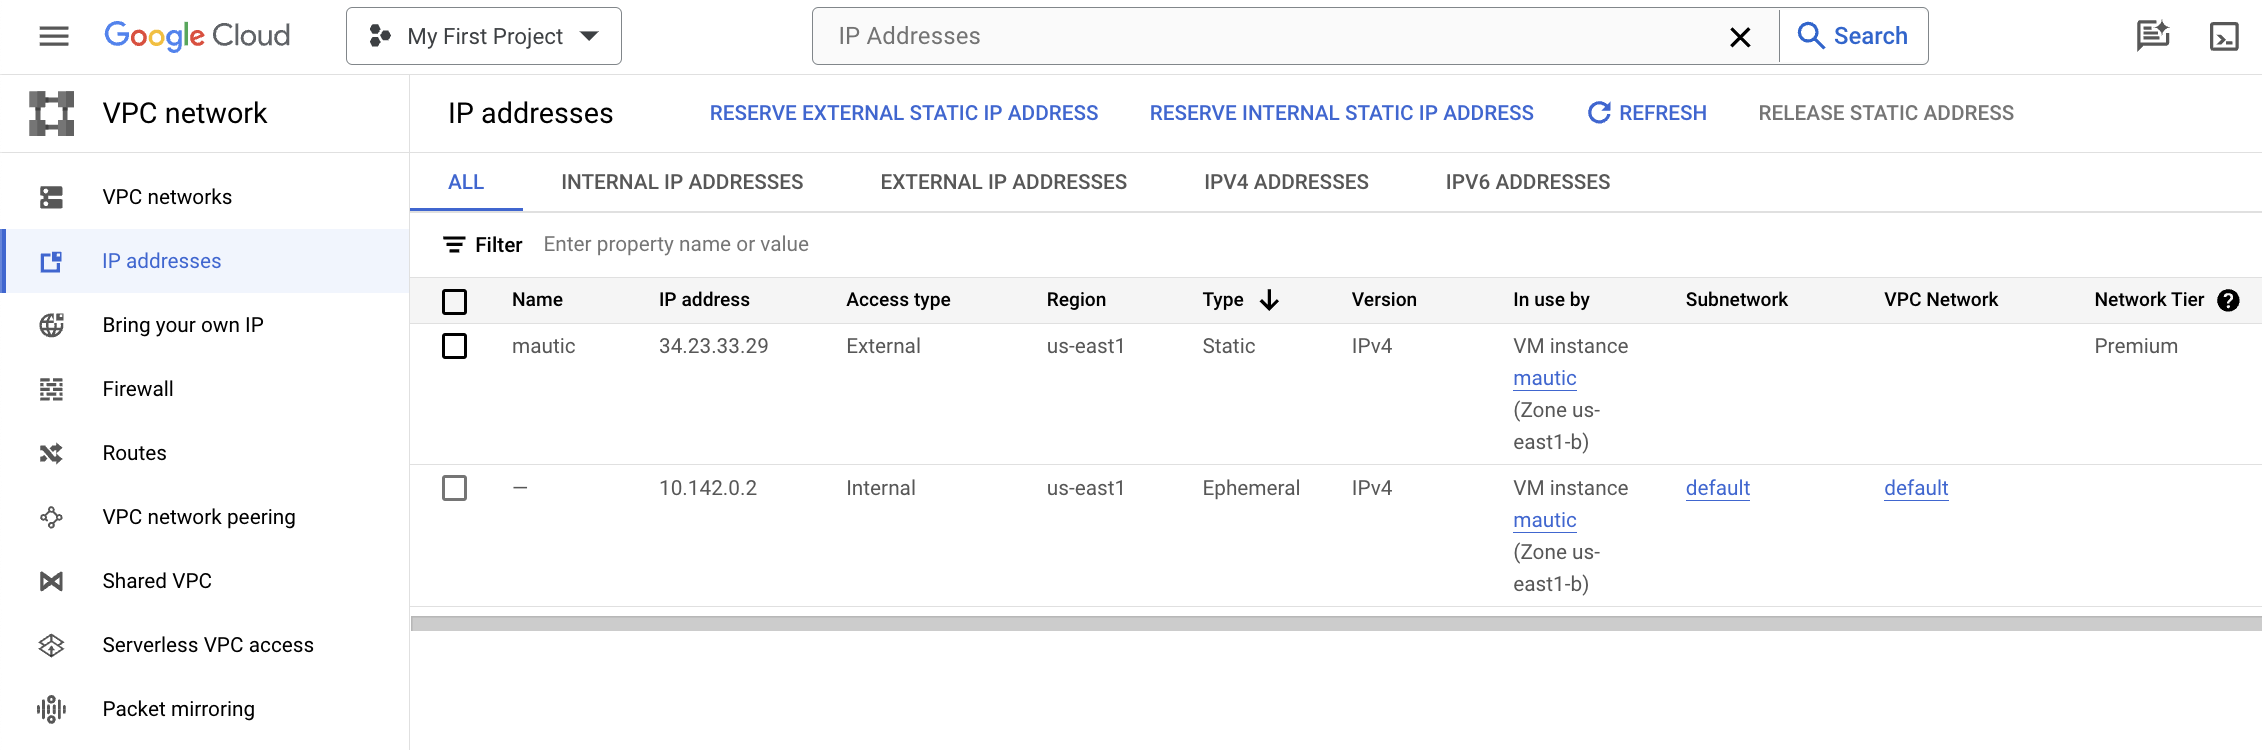
To prevent the IP address from constantly changing, it is better to reserve a static IP address in Google Cloud, then assign it to your VM. From the search box at the top of the Google Cloud Console, type “IP Addresses (VPC Network)” and select the same from the list of suggestions in the drop down.

Then, click the “Reserve External Static IP Address” link in the navigation bar towards the top of the page. You can configure the parameters like as shown in the following screenshot, then click “Create” to proceed.

The most important setting to pay attention to is the Region and Attached to dropdowns. The region must match where you previously deployed the VM, so that you can attach it to the specific VM name, in this case “mautic”.
Once you do this, the ephemeral external IP address will be replaced with a reserved static IP address. You can always find this external IP address by going to the list of VM instances under Compute Engine, or under the list of IP Addresses under VPC network in the Google Cloud Console.
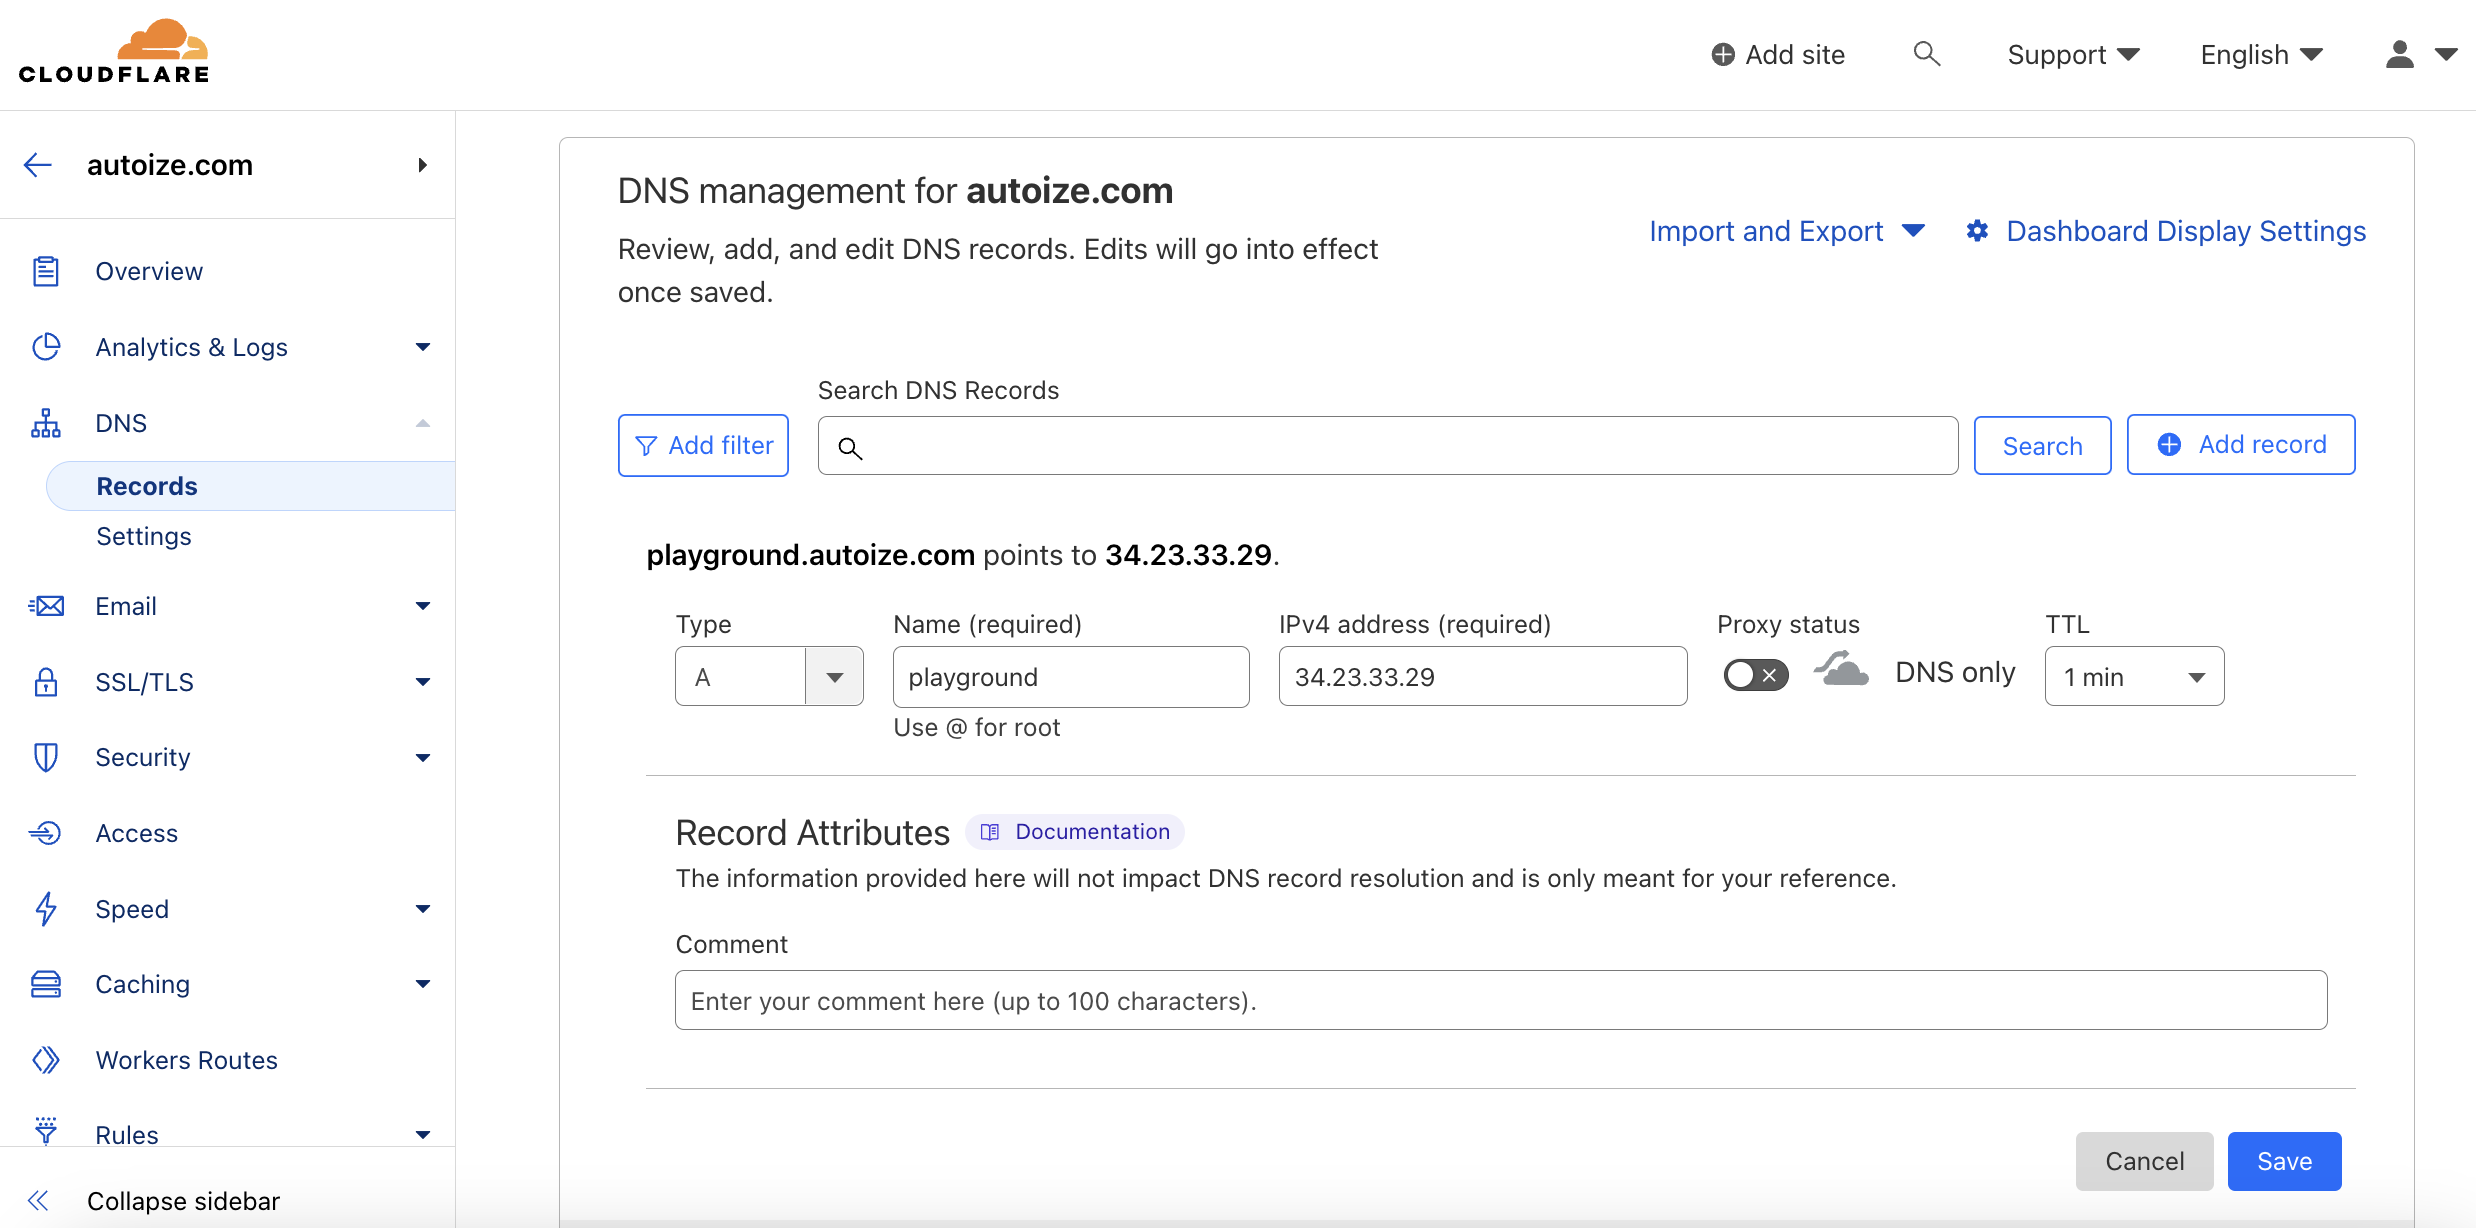
You should create an A record at your domain’s authoritative DNS nameservers pointing the desired Mautic subdomain to the static IP address. For example, if you want your Mautic emails and landing pages to be hosted at outreach.yourdomain.com, the A record to add in your zone would be for “outreach”. Likewise, if we wanted the Mautic URL to be playground.autoize.com instead for our example below, we would set the A record for “playground”.
You can use a WHOIS search to determine where your DNS records are managed. Depending on your setup, it may be your domain registrar, the existing web host for your website, or a managed DNS service such as CloudFlare or DynDNS.
Please refer to your DNS providers’ documentation and support resources for how to add an A record as follows:
| Record | Record Type | Value | TTL |
| Desired Mautic URL before your 2nd level domain (e.g. outreach) | A | Reserved static IP address for your VM (34.23.33.29) | Auto, or as low as possible to expedite propagation |
For the example instance in this guide, we will set up our Mautic URL at playground.autoize.com. We use Cloudflare (CF) as our managed DNS provider, so the configuration looks like the screenshot below, from the Cloudflare control panel. For simplicity, we won’t cover vendor-specific options such as setting CF “page rules” in this guide. Therefore, we are disabling Cloudflare’s security & performance features that require traffic for the subdomain to be proxied through their CDN edge locations (PoPs), and setting a DNS record only.
- Before accessing the Linux command line (terminal) of your VM over SSH to install Mautic 5 and its dependencies, you must add the public key corresponding to your local machine’s SSH keypair to the list of project-wide keys in Google Cloud.
If you do not yet have an SSH keypair, you can generate one using the ssh-keygen command from Powershell/Windows Terminal in Windows 10/11 or the Terminal app in MacOS on your local machine. Unless the machine (referring to your workstation, not the Google Cloud VM) already has a keypair you are concerned about overwriting, you can simply accept the default key name (id_rsa), and do not need to set a passphrase.
For Windows, the resulting keypair will be stored at C:\Users/<username>/.ssh/id_rsa (private key) and id_rsa.pub (public key), and for MacOS, the keypair will be at /Users/<username>/.ssh/id_rsa (private key) and id_rsa.pub (public key).
Using your preferred text editor, open the id_rsa.pub file and copy its content to the clipboard. Then, return to the Google Cloud Console and in the search bar, type “SSH Keys”, then click the “Add SSH Key” button highlighted in blue.
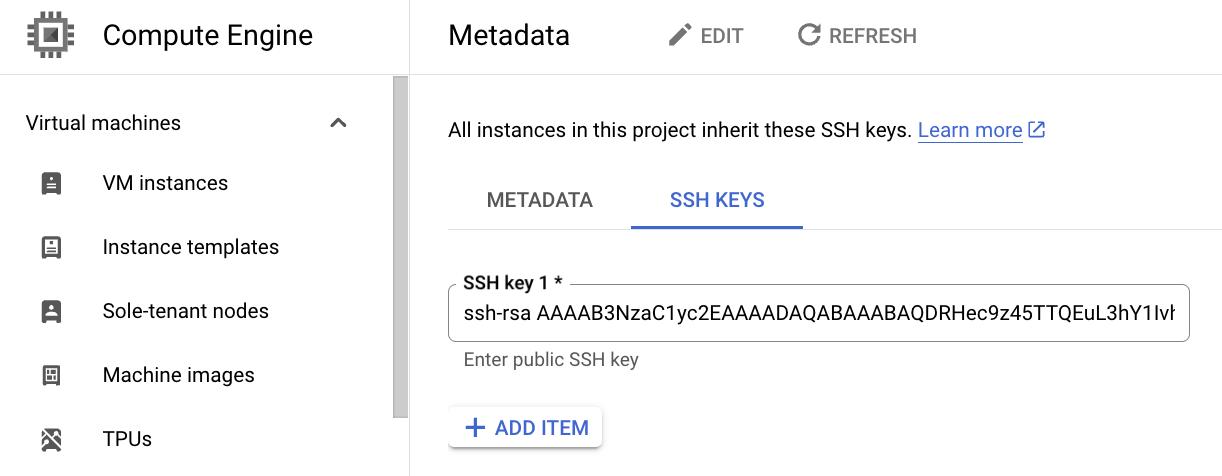
Paste the public key into the text box labeled SSH Key 1. Note that the key must end with a label in the format username@machinename, following the RSA public key string (separated by a space). An excerpt example is shown below:
ssh-rsa AAAAB3NzaC1yc2EAAAADAQABAAABAQDRHec9z45TTQEuL3hY1Ivh…Q7Jfo59UIVBxFmet autoize@mbair
When logging in, the same username will also be used as the Linux username on the Google Cloud VM; In the above example, it would be “autoize”. Once done providing the key, click the “Save” button at the bottom of the page.
The keys authorized here will have access to all VMs in the Google Cloud project, hence they are known as project-wide keys. You should not authorize a key belonging to anyone unless you absolutely trust them with root access to your VMs.